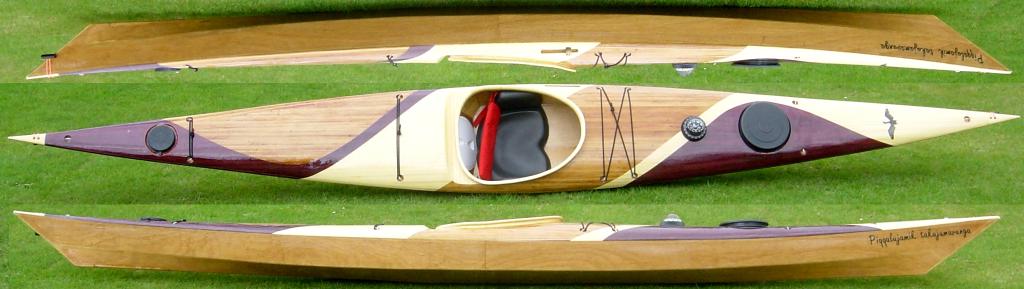
Piqqalujamik takujumavunga
Following the success of my first sea-kayak, the Geyrfugl, built for my small daughter, I was keen to build another boat, better suited to my own size and paddling needs. I had a perfectly good commercial composite sea kayak - a North Shore Mistral - so I wanted a boat addressing somewhat different paddling conditions than that. My first design was for an expedition-style kayak based on an Aleut Baidarka, and building this is still in the offing (the Borealis project), but that boat was too long for my biggest heatable space, so I couldn't build her in the winter. Instead, mindful of the fact that smaller members of the family were still in need of boats, I decided on a nifty manoeuverable dayboat which would double as a longer tripping boat for lighter paddlers. Since I wanted this to be a quicker project than Geyrfugl, I chose a hard-chined design which I could build as a stitch-and-glue hull, but still indulge in some artistry with a stripped deck.
Looking for suitable published designs, I was attracted to Squeedunk Kayaks' Cormorant 16, mainly because of the availability on their website of both panel offsets and a vrml file from which I could construct traditional style offsets, enabling me to fiddle with the design and calculate various things like displacement and drag coefficients. The design length - sixteen feet, was still too big for my space, and the design displacement was bigger than I needed - paddling Geyrfugl had convinced me that small hulls were fun and for a rock-hopping dayboat I would be carrying very little cargo. So I converted from imperial to metric at a rate of 24 mm to the inch. This made the calculations very easy, since eighths go to 3mm, sixteenths to 1½mm and the "+" and "-" adjustments to ½mm. The result was a boat 4.66m long.
Squeedunk have two alternative deck designs - a conventional S+G arched deck, and a multi-panel deck fitted to a lowered sheer line and slightly reduced beam. I took the hull measurements for this lower sheer, and based my own deck design roughly on Squeedunk's deck height, fore and aft. My foredeck is a half-ellipse with a peak height above the sheer of 0.235 times the beam. The aft deck is similar, with a height 0.175 times the beam.
I decided to use this boat as a vehicle for some experiments, so I would have a skeg, a Valley round hatch on the foredeck, and access to the aft compartment would be through a hatch in the bulkhead behind the cockpit. Access to the skeg cable would be via a tiny (10cm diameter) Kajak-sport hatch right near the stern, giving a largely clean aft deck. I proposed to use a small ocean-style cockpit (rather than a large keyhole affair), make both the bulkheads sloping, and to build a knee-tube for storage and bracing. I decided that this boat would probably not be long enough, nor track straight enough to put in a sail rig.
Having got the design, I plotted out several A3 sheets showing half a dozen copies of the plan view, and played with deck stripping designs. So did my daughter, and son, and various friends.... not all of whom could appreciate just how difficult to build their ideas might be :-) Eventually, I had it down to two general sorts of design, and one example of each that I liked. I had lots of Western Red Cedar (the same recycled ceiling panels as used on Geyrfugl), various amounts of pine (DIY centre stuff sold as "stripwood (pine)" and stuff sold as "Scandinavian Pine (Redwood)" which is actually Scots Pine (Pinus sylvestris) a wood very similar to Lodgepole Pine of America) and some "Southern Yellow Pine". I had bought some American White Ash, and I wanted a much darker wood for contrast, so had obtained a plank of Brazilian Purpleheart. Later I got hold of some Padauk, which is only used for some minor detail work on this boat.
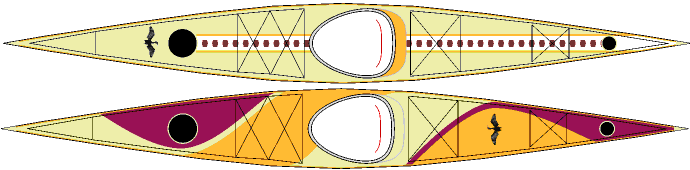
I thought the first design, with a broad feature strip along the centre line, would be easier to build, precutting Ash and Purpleheart to make the hexagons, using WRC for the border strip, and then filling the rest of the deck with the easily worked Pine. But my gut feeling was that I would prefer the second design, a much bolder pattern that I could see would be more difficult, especially at the sheer. Nothing ventured ... so I went for the second. Remind me not to indulge in stripping large areas of Purpleheart in future - it was difficult to cut into strips with the bandsaw, and difficult to plane, sand and indeed bend :-( On the other hand it does look very good when finished.
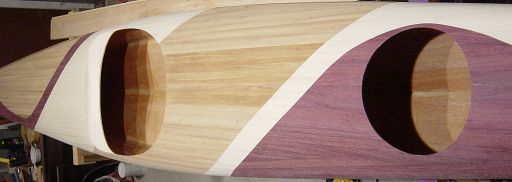
That was the state of construction as I finished stripping the deck, after 153 hours work over ten weeks. Another day saw the forward hatch recess built, a little filling work to hide odd holes where the purpleheart had been a bit too intransigent, and the sealer coat applied. Filler made from Purpleheart sawdust and epoxy really is a spectacular colour ! The wood itself is pretty impressive, and makes a real contrast with the pine. After epoxy coating, the cedar shows the greatest colour change, though all three woods are likely to darken over time.
A few statistics - remember that these are for the scaled boat, which is 94.5% of the size of Squeedunk's original Cormorant 16:
| Length | 466 cm |
|---|---|
| Waterline Length | 409 cm |
| Overall Beam | 52.2 cm |
| Waterline Beam | 49 cm |
| Draught | 11.3 cm |
| Design displacement | 82 Kg |
| Finished mass | 17 Kg |
| Prismatic Coefficient | 0.47 |
| Block Coefficient | 0.37 |
Disclaimer: these hydrostatic figures are calculated by some fairly crude software from the scaled offsets, in turn derived from Squeedunk's vrml file, and a bit of deduction to get a modified sheer line from the multipanel deck panel offsets. The displacement is probably a slight underestimate, and I suspect that the waterline used doesn't quite reflect the true trim of the boat (so I haven't bothered giving you figures for Longitudinal Centre of Buoyancy etc., which I have probably miscalculated anyway). The finished mass was measured using bathroom scales (and includes the compass and deck rigging), so may also be a bit approximate, but the boat certainly feels a lot lighter than my commercial fibreglass boat, which is supposed to be 21 kg, not counting its compass.
Interestingly, though the overall length is 35cm longer, the waterline
length of this boat is slightly less than that of Geyrfugl when the
latter is overloaded to the same displacement, and the beam is a little more.
That should make the boat a little slower, but a lot more stable, which is
what I need for playing in surf among the rocks !
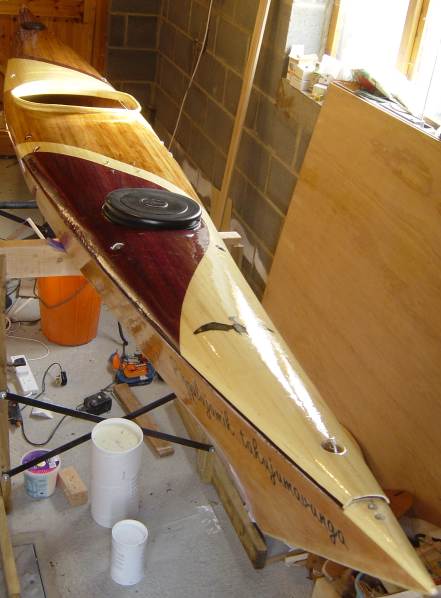
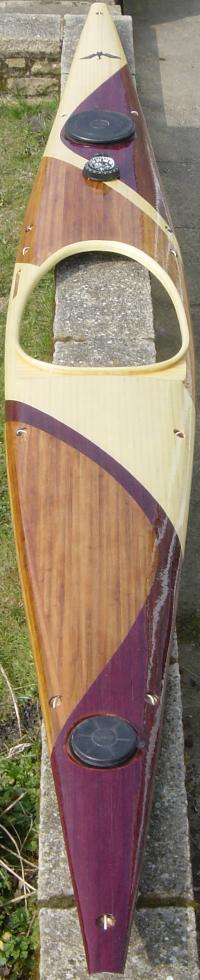
The completed deck sitting on the completed hull, just prior to strapping the two together to make the seams - 244 hours work so far.
Piqqalujamik takujumavunga - not a name which exactly rolls off the
tongue of the average English-speaker (indeed, my failure to pronounce it
at the first attempt on the launching weekend immediately led to her being
nicknamed the "buggrit, millennium hand and shrimp"). Being a West Greenland
style of design, I decided that a West Greenlandic name would be appropriate,
and the first version was "Oqaatsoq", meaning cormorant, but somehow I didn't
like this. More reading and an idea of what I would like to be able to do
with a Greenland style hard-chined boat led to her being called "I want to
see an iceberg".
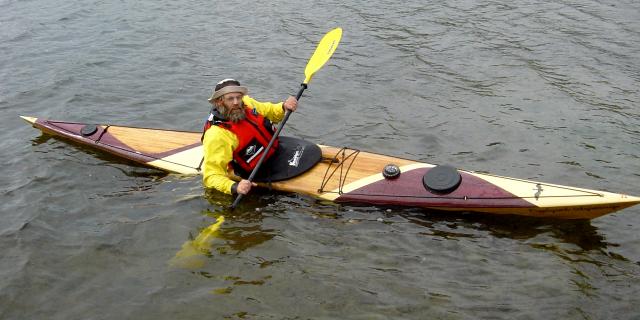
Actually, the maiden voyage was 2003-04-09, on Ullswater, when I did a 7½ mile paddle in flat calm conditions - but with no-one to take photos. After that paddle, I cut open the skeg slot, and fixed the skeg control cable in place, but didn't have time to actually fit the skeg before a scheduled weekend trip to Lake Bala in Wales, where I had the opportunity to play a little, and do a direct comparison with Geyrfugl on the Saturday. The above photo (and others on the Cormorant Paddling page) was taken by Sue Sharman, who was also doing a sterling job of marshalling six children (two of mine, two of hers and two more) on the shore at the same time - many thanks Sue !
After 280 hours work (and a full season's paddling), the boat is seaworthy, but still unfinished. All the deck rigging needs to be removed whilst the sheer tape is feathered, a few more bits of epoxy applied, then the whole boat sanded and varnished repeatedly. I'm hoping the job will be complete in under 300 hours total. There are lots of building photos, many of which are now making their way to these pages.