Geyrfugl - building
Nick Schade's
book purports to be all a complete novice needs to read to be able to
build a beautiful and functional cedar-strip sea kayak.
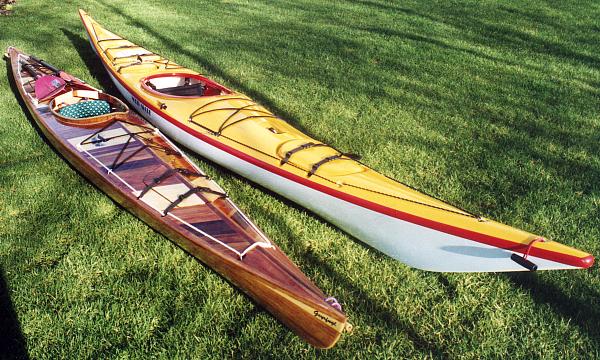
 Well, I have never met or spoken to anyone
who has built a cedar-strip kayak, nor had I ever seen such a boat until I
had completed my own first project. Whilst I cannot deny having read rather
more widely than Nick's book, and I might well, in my next boat, use some of
the techniques noted in other sources, the Geyrfugl was built
using only methods and designs described in "The Strip-built Sea
Kayak" or of my own invention based
on that. Nick says that the book will enable "anyone who has ever picked up a
hand tool" to build such a boat. My five-year old son is always picking up my
hand tools (especially any hammers left unattended for a moment) and perhaps
such a boat will be beyond him for a while yet, but in essence, all you need
is that book and a generous supply of concentration and patience.
Well, I have never met or spoken to anyone
who has built a cedar-strip kayak, nor had I ever seen such a boat until I
had completed my own first project. Whilst I cannot deny having read rather
more widely than Nick's book, and I might well, in my next boat, use some of
the techniques noted in other sources, the Geyrfugl was built
using only methods and designs described in "The Strip-built Sea
Kayak" or of my own invention based
on that. Nick says that the book will enable "anyone who has ever picked up a
hand tool" to build such a boat. My five-year old son is always picking up my
hand tools (especially any hammers left unattended for a moment) and perhaps
such a boat will be beyond him for a while yet, but in essence, all you need
is that book and a generous supply of concentration and patience.
Having cut the forms and threaded them onto my strongback, I found getting
them accurately aligned to be a lot harder than I imagined from reading the
book. After a day and a half, I started again from scratch, using a slightly
different technique, and using thin wedges to hold the forms in place and
move them gently by a fraction of a millimetre at a time. This was more
successful, and after another day or so, I was satisfied. It later became
apparent that one form in the middle was slightly twisted out of alignment
(I think this must have happened after I started stripping) but one would
have to know this and look for the consequences to actually spot the problem
in the finished boat.
Since I was not using cove-and-bead strip, and my strips, being cut from
3m planks, were shorter than the boat, I had a potential problem in joining
strips together and keeping them aligned. Initially I approached this by
making through-the-thickness scarfs to make strips longer than the boat, but
I only had enough space and clamps to do a very small number of strips per
day this way, which was keeping progress very slow at first. On a future
boat, I would probably do this sort of scarf for the sheer strip and maybe
the next, but after that I would go to butt-joins or across-the-width scarfs
glued in situ.
 To avoid
too much bending in strips at the stem and stern, Nick suggests using
"cheater strips", which also help later on to ensure that the transition at
the keel occurs at the same level fore and aft. Here I deviated from Nick's
recommendations in two ways. The first strip below the sheer was laid much
straighter, and I then filled in the gap with several such cheater strips,
rather than alternating long strips with single cheaters. I think this works
OK. My cheater strip nearest the sheer was of a contrasting material (spruce)
in a wider strip. This was not as successful - not so much for the contrast
of material (which is used as background to the name of the boat) but for the
width of the strip, which made it difficult to plane and sand a fair curve in
the bow.
To avoid
too much bending in strips at the stem and stern, Nick suggests using
"cheater strips", which also help later on to ensure that the transition at
the keel occurs at the same level fore and aft. Here I deviated from Nick's
recommendations in two ways. The first strip below the sheer was laid much
straighter, and I then filled in the gap with several such cheater strips,
rather than alternating long strips with single cheaters. I think this works
OK. My cheater strip nearest the sheer was of a contrasting material (spruce)
in a wider strip. This was not as successful - not so much for the contrast
of material (which is used as background to the name of the boat) but for the
width of the strip, which made it difficult to plane and sand a fair curve in
the bow.
I also found it very hard to make the transition from stripping down from
the sheer to stripping out from the keel at all tidy. Indeed, I ended up with
an unsightly gap right in the keel line. This was readily dealt with later by
adding a hardwood stem piece, but fitting this involved planing down so far
that I could not easily avoid getting epoxy onto the end form, which needed
some very careful masking in order to get a hull which would actually be
possible to remove from the forms. In future I would be tempted to make an
inner stem piece and glue the strips directly to this, as Nick describes as
an alternative technique. (In fact this is academic on both my next projects:
I am currently building a sea playboat scaled down slightly from Squeedunk's
Cormorant 16, with a stitch and glue hull and stripped deck. Beyond that,
will be a baidarka-style boat inspired by Laughing Loon's NorthStar,
on which the stem and stern treatment is quite different anyway).
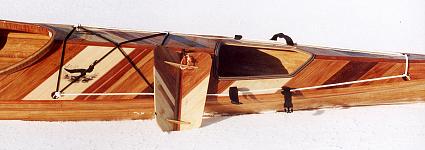
With the hull stripped, I immediately went on to strip the deck, with the hull still on the forms. Now the design I had adopted has a very abrupt
transition from the hull to an almost flat deck near the stern and a peaked
deck near the bow, but with a much more rounded transition near the cockpit.
This is actually quite a hard thing to do, as you need either a lot of twist
on one or two strips, or some other way to get all the angles to blend in.
Perhaps one way would be to use some narrower, but thicker strips, and then
get the shape fair by sanding later. However, what I actually did was add a
strip the full length of the deck, adjacent to the sheer at bow and stern and
some way above the sheer, where the deck angle was similar, near the cockpit.
I then filled in the gap between this strip and sheer, which involved a great
deal of planing difficult bevels onto long thin strips later. I suspect this
was a lot harder than I could have made this part of the job, but by this
stage I was gaining confidence in my ability to get difficult strips to fit,
and the result certainly looks OK now the boat is finished.
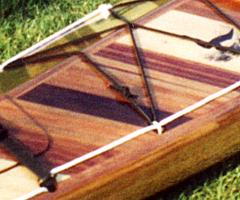 Having got this
first strip above the sheer, I then put a double strip along the deck peak,
added some stringers to the forms, and stripped between them with a series of
short diagonal strips to form a broad chevron pattern on the deck using three
contrasting woods (red cedar, mahogany from an old piano and spruce left over
from some building work - I didn't actually buy any timber at all for the
boat). This stripping pattern involved a lot of glued joints between edge
grain at the ends of the short strips, and the long smooth sides of the
longitudinal strips. This was to prove to be a problem later in construction,
though not in the finished boat.
Having got this
first strip above the sheer, I then put a double strip along the deck peak,
added some stringers to the forms, and stripped between them with a series of
short diagonal strips to form a broad chevron pattern on the deck using three
contrasting woods (red cedar, mahogany from an old piano and spruce left over
from some building work - I didn't actually buy any timber at all for the
boat). This stripping pattern involved a lot of glued joints between edge
grain at the ends of the short strips, and the long smooth sides of the
longitudinal strips. This was to prove to be a problem later in construction,
though not in the finished boat.
After stripping both hull and deck, a niggling worry now loomed large. I
knew that I had got glue onto the end forms during stripping, beyond the area
which I'd masked with tape, and I was anticipating having a lot of trouble
getting the hull off the forms. There was also a risk that I'd got epoxy onto
the end forms when adding the hardwood stem pieces. I reckoned the deck would
come off a lot more easily. So I went ahead and faired the hull and deck with
plane and then sanding and then decided to remove the deck from the forms
first - without glassing it. In fact, all those short strips had involved a
lot of glue, and the deck was very thoroughly stuck to the tape over the
forms - getting the deck unstuck was really hard! Doing this did indeed make
it a lot easier to get the hull off the forms later, but in the meantime two
untoward things occurred. Firstly, one of the seams between edge grain of
short strips and a longitudinal strip on the deck peak split completely, and
a few other glued joints looked pretty fragile. Secondly, work on our house
electrics resulted in the barn, where I was building the boat, being without
any power (as it still is, several months later). This meant that I stopped
work on the boat with the (damaged) deck off the forms, for several weeks in
autumn when everything started to get cool and more humid. I do not recommend
this !!
My resin and glass arrived, and it became clear that power to the barn was
not going to return. Autumn was heading for winter. I discovered that such a
short boat could just be fitted into a garage which I could heat, and so the
hull was moved and left to get warm and dry for a while ready for glassing. I
think this was the step I was most dreading, as it seemed to me that anything
going wrong here would not be easily mended. In fact, Nick's instructions are
more than detailed enough, and the working time of West System 105/207 long
enough that this was a much easier task than I had anticipated and I would
urge anyone put off by the prospect of glassing and epoxying a boat to stop
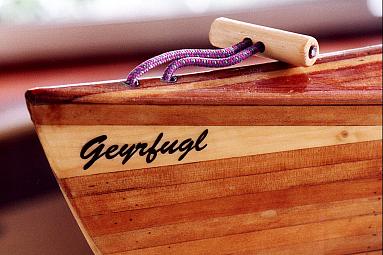
worrying - this is far from the hardest part of the job ! I laser-printed
the name "Geyrfugl" onto tracing paper and applied this to the bow along
with the first sealing coat of resin.
Once the outside was glassed, I was able to remove the hull from the forms
with a lot less trouble than I had expected, and soon faired and glassed the
inside. I had eventually decided on a slightly heavier lay-up than my initial
ideas, with 4oz on the outside, doubled on the bottom of the hull, and a
single layer of 6oz glass on the inside. However, perhaps during this stage
the hull was still in transition from the cool humid conditions of the barn
to the warm dry conditions I had found for doing the resin work. It
transpired that the hull had curled inward very slightly and after glassing
the inside, the beam was less than it should have been. However, I did not
realise this for some time...
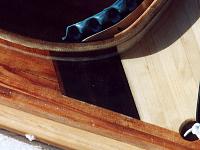 I now returned the deck to the forms and
cleaned up the damaged glue joints. A few staples held the deck back on the
forms whilst these joins were reunited - using epoxy this time. The big long
joint which had split was repaired well enough not to show, but a small area
towards the rear of the cockpit where more strips also joined at odd angles
didn't fare so well. The rejoined edges were far from level and looked a bit
tatty. I sanded these down flat, and covered an area each side with a veneer
(of Macassar Ebony) cut and laid parallel to the chevrons of the aft deck.
The veneer stands slightly proud of the surrounding deck area, but this is
partly offset by butting one layer of glass up to the edge of the veneer
where the glass from fore and aft decks overlap. All the tattiness is hidden
and the very dark veneer fits well with the design of the rest of the deck.
I now returned the deck to the forms and
cleaned up the damaged glue joints. A few staples held the deck back on the
forms whilst these joins were reunited - using epoxy this time. The big long
joint which had split was repaired well enough not to show, but a small area
towards the rear of the cockpit where more strips also joined at odd angles
didn't fare so well. The rejoined edges were far from level and looked a bit
tatty. I sanded these down flat, and covered an area each side with a veneer
(of Macassar Ebony) cut and laid parallel to the chevrons of the aft deck.
The veneer stands slightly proud of the surrounding deck area, but this is
partly offset by butting one layer of glass up to the edge of the veneer
where the glass from fore and aft decks overlap. All the tattiness is hidden
and the very dark veneer fits well with the design of the rest of the deck.
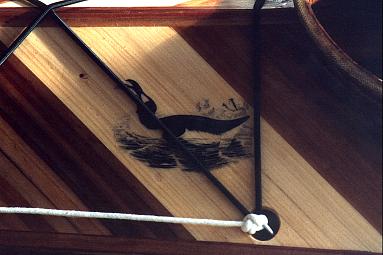 One of the broad
chevrons of light-coloured spruce was chosen to receive a Great Auk graphic
from the Royal Ontario Museum website - one each side of the deck ridge,
laser-printed onto tracing paper as for the boat's name and a "maker's plate"
inside the hull.
One of the broad
chevrons of light-coloured spruce was chosen to receive a Great Auk graphic
from the Royal Ontario Museum website - one each side of the deck ridge,
laser-printed onto tracing paper as for the boat's name and a "maker's plate"
inside the hull.
Once I'd glassed the deck, I cut the cockpit recess (I know this is the
wrong order, but it was clear that the deck wasn't strong enough to do this
until I had glassed at least the outside). Upon taking the deck off the forms
again and trying the fit with the hull, it became clear that there was a big
mismatch. Given my experience with the deck, I assumed that I had allowed it
to flatten and become wider than the hull, and started taking steps to make
the deck peak angle more acute. Big mistake ! If something is wrong, measure
first before assuming where the problem is. Once I had realised that it was
the hull that was wrong (mainly because I couldn't get the deck to fit at all
and was forced to measure everything) I had quite a bit of glass to remove
from the inside of the deck to undo my attempted fix. The correct solution
was to wedge the hull wider to fit, at the stage of joining hull and deck,
but that came later.
Another step that sounded a lot harder than it proved to be was building
the cockpit coaming from lots of short strips. This went in two or three
sessions of only a couple of hours each. I chose wood to match the deck at
each point, and made a few narrow strips to get the transitions at just the
right points. I think another time I might not do this - the spruce strips
later proved to be more difficult to sand fair than the harder mahogany which
adjoined the ebony veneer. I put a 7 or 8 cm strip of glass cut on the bias
around the outside of the coaming (in three overlapping sections so I could
get each one fairly neat within the working time of the resin). This made the
whole thing strong enough to mean that I could now handle the deck a bit
less carefully, which was useful, as my earlier mistakes meant quite a bit
of fairing on the inside of the deck. A bit of fairing putty filled a few
divots which had been created when removing glass earlier, and after a
further resin coat all over, the inside deck looked quite acceptable again
by the time it was glassed.
 Cutting the hatches was less
nerve-racking than expected. I used a power padsaw, but rather than lowering
this onto the deck whilst running, as illustrated in the book, I simply
started the cut by using a blade from the saw by hand. I used 4mm plywood for
the hatch lips, cut in two pieces for each hatch.
Cutting the hatches was less
nerve-racking than expected. I used a power padsaw, but rather than lowering
this onto the deck whilst running, as illustrated in the book, I simply
started the cut by using a blade from the saw by hand. I used 4mm plywood for
the hatch lips, cut in two pieces for each hatch.
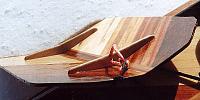 The hatches felt strong, but I
worried about the risk if they were stood upon when off the boat, so
reinforced them with two triangular pieces of hardwood inside, glassed over.
For each hatch cover, one of these bits of ash had a hole cut to attach a
retaining cord. Again, I hadn't needed to buy this hardwood - all my ash was
cut with the bandsaw from branches removed from
trees on our property. This particular
branch had seasoned by lying next to the compost heap for a couple of years !
The hatches felt strong, but I
worried about the risk if they were stood upon when off the boat, so
reinforced them with two triangular pieces of hardwood inside, glassed over.
For each hatch cover, one of these bits of ash had a hole cut to attach a
retaining cord. Again, I hadn't needed to buy this hardwood - all my ash was
cut with the bandsaw from branches removed from
trees on our property. This particular
branch had seasoned by lying next to the compost heap for a couple of years !
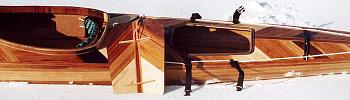
 The boat almost looked ready
to mate hull and deck, but in fact there was still quite a lot of work. I
used some old 5/16 inch PMI pit rope (an originally white kernmantel nylon
caving rope, some 20 years old and needing retiring from mission-critical
load-bearing use :) for the cockpit rim. Nick says that it is hard to get a
watertight seal between a rope rim and a spraydeck, but I presume this
applies to a laid rope. Once glassed over, the kernmantel rope gives a nice
smooth surface, though it is quite difficult to get it at a constant height
above the deck when tacking it in place with hot-melt glue. Perhaps this
would be easier with new rope than rope old and somewhat kinked from much
heavy caving use ! The details of the nineteen recessed deck fittings and
steel wire security fitting are elaborated on
their own page, but each fitting took
quite a while. Drilling out inch diameter holes in the deck proved to be
quite nerve-racking !
The boat almost looked ready
to mate hull and deck, but in fact there was still quite a lot of work. I
used some old 5/16 inch PMI pit rope (an originally white kernmantel nylon
caving rope, some 20 years old and needing retiring from mission-critical
load-bearing use :) for the cockpit rim. Nick says that it is hard to get a
watertight seal between a rope rim and a spraydeck, but I presume this
applies to a laid rope. Once glassed over, the kernmantel rope gives a nice
smooth surface, though it is quite difficult to get it at a constant height
above the deck when tacking it in place with hot-melt glue. Perhaps this
would be easier with new rope than rope old and somewhat kinked from much
heavy caving use ! The details of the nineteen recessed deck fittings and
steel wire security fitting are elaborated on
their own page, but each fitting took
quite a while. Drilling out inch diameter holes in the deck proved to be
quite nerve-racking !
A series of pieces of wood cut to length and taper, and hammered into the
hull got the width to match the deck quite closely - no way could
fibre-reinforced packing tape exert this amount of force ! Access to the
inside seams was made rather difficult by the recessed deck fittings, so that
I elected to apply a series of short pieces of fibreglass tape on top of a
fillet painted into the join, rather than Nick's idea of soaking a large roll
of tape in resin and laying it out all in one go. The size of the cockpit and
hatches also meant I couldn't get both head and arm into the inside of the
kayak at once and reach into the ends, so the tape inside stops quite a way
short of the ends of the kayak. An extra resin fillet went into these bits
after the outside seam and end-pours were done.
By contrast, the outside deck-to-hull seam was easy, and done with a
single piece of tape round the whole boat, which made the bows slightly
neater. It was only at this stage, with the deck in place and recessed deck
fittings finished, that I filled the weave of the glass outside the deck.
Doing it this way made a squeegee pretty hard to use, but on the other hand,
I don't think I would have avoided scratches on the finish if I had filled
the weave soon after applying the glass. Recessed deck fittings look great,
but they certainly make the deck quite a bit more difficult to build.
The boat was now basically sea-worthy, but I managed to resist the obvious
temptation long enough to do the end toggles and both forward and aft
bulkheads, which were of unglassed 6mm ply. I had planned to put the forward
bulkhead at a position which would make the boat a good fit for my wife, but
had overlooked thinking about this when doing two of the deck fittings. They
were in the way, and this bulkhead had to go a few centimetres further
toward the bows. A consequence of this is that I can actually fit my legs
into the boat, though I am some 40kg heavier than the largest intended
paddler, so I did't expect to be able to use it (but see the
Geyrfugl in use page). The small amounts
of resin left after fitting each bulkhead were used to add four pad-eyes
inside the boat - two for the shock-cord to the back of the backstrap, and
one for each hatch to tie the covers to the boat.
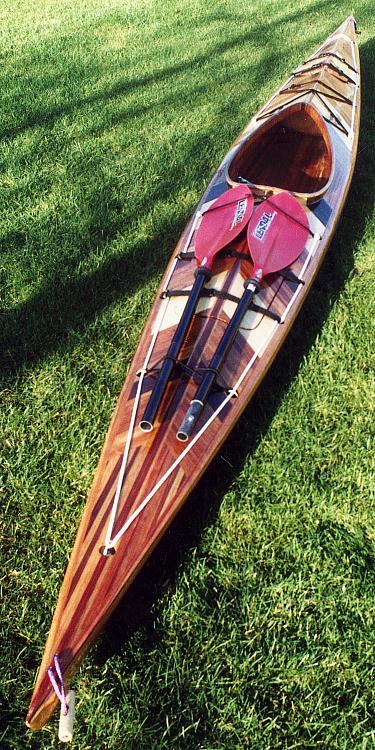
 With bulkheads in place I
sanded down the outside, creating a great deal of fine dust, so moved the
boat into our conservatory for the first coat of varnish. It took only a few
minutes to add the hatch seals, and then the various deck lines and retaining
straps. I had built a back strap and this fitted neatly onto the cords
already in place on the cheek plates. This was Monday 2002-02-11, which
proved to be sunny, so no time was wasted in getting the "finished" boat
outside onto the lawn and finishing the films in two cameras.
With bulkheads in place I
sanded down the outside, creating a great deal of fine dust, so moved the
boat into our conservatory for the first coat of varnish. It took only a few
minutes to add the hatch seals, and then the various deck lines and retaining
straps. I had built a back strap and this fitted neatly onto the cords
already in place on the cheek plates. This was Monday 2002-02-11, which
proved to be sunny, so no time was wasted in getting the "finished" boat
outside onto the lawn and finishing the films in two cameras.
I had decided to fit footrests to make the boat usable by my growing
daughter, and I needed a moulded foam seat as well as various bits and pieces
for other kayaks, so a trip to Knoydart kayaking systems in Keswick on the
next day provided an excuse for a short "sea" trial on Derwent water. The
experience is included in the Paddling
Geyrfugl page.
 In the week since the trial launch, I've had
the deck lines off again and applied two more coats of varnish. The foam seat
is in place, but probably needs to be trimmed down a little and attached to
the hull with velcro so that its position can be adjusted for a very short
paddler. I have a pair of Keepers footrests and I'm trying to work out if I
can attach these without drilling holes in the hull. Having finished in
February - still the white water paddling season in the UK - there were still
quite a few weeks for the finishing touches before the weather got warm
enough for a real maiden voyage by Geyrfugl's intended paddler.
In the week since the trial launch, I've had
the deck lines off again and applied two more coats of varnish. The foam seat
is in place, but probably needs to be trimmed down a little and attached to
the hull with velcro so that its position can be adjusted for a very short
paddler. I have a pair of Keepers footrests and I'm trying to work out if I
can attach these without drilling holes in the hull. Having finished in
February - still the white water paddling season in the UK - there were still
quite a few weeks for the finishing touches before the weather got warm
enough for a real maiden voyage by Geyrfugl's intended paddler.
By the end of August, all the family (and quite a few friends) have
paddled Geyrfugl, and the conclusion is that she is fast, stable for small
paddlers and fun to paddle. She surfs on pretty small waves and tracks really
well for all but the smallest of paddlers who suffer somewhat from windage.
Sarah and Michael can both climb into her from deep water, and the hatches
don't leak, even with the boat upside down, and two children stood on the
hull punting her along with a paddle (yes, it has been that kind of a
summer:)
© A.E.R.Waddington, 2002
Contact the author: mailbox <andrew>
on site <pennine.demon.co.uk>
 Well, I have never met or spoken to anyone
who has built a cedar-strip kayak, nor had I ever seen such a boat until I
had completed my own first project. Whilst I cannot deny having read rather
more widely than Nick's book, and I might well, in my next boat, use some of
the techniques noted in other sources, the Geyrfugl was built
using only methods and designs described in "The Strip-built Sea
Kayak" or of my own invention based
on that. Nick says that the book will enable "anyone who has ever picked up a
hand tool" to build such a boat. My five-year old son is always picking up my
hand tools (especially any hammers left unattended for a moment) and perhaps
such a boat will be beyond him for a while yet, but in essence, all you need
is that book and a generous supply of concentration and patience.
Well, I have never met or spoken to anyone
who has built a cedar-strip kayak, nor had I ever seen such a boat until I
had completed my own first project. Whilst I cannot deny having read rather
more widely than Nick's book, and I might well, in my next boat, use some of
the techniques noted in other sources, the Geyrfugl was built
using only methods and designs described in "The Strip-built Sea
Kayak" or of my own invention based
on that. Nick says that the book will enable "anyone who has ever picked up a
hand tool" to build such a boat. My five-year old son is always picking up my
hand tools (especially any hammers left unattended for a moment) and perhaps
such a boat will be beyond him for a while yet, but in essence, all you need
is that book and a generous supply of concentration and patience.