The Geyrfugl - a few unusual features
Nick Schade's suggested methods of fitting hatch-retaining straps and deck
lines rely on hardwood pad-eyes fitted to the deck. All my previous reading
suggests that sticky-up deck fittings tend to make deep-water rescues harder
and can shred clothing, especially things like drysuits which don't work well
with holes in ! All the commercially built (composite or roto-moulded) sea
kayaks I have seen have recessed deck fittings and I decided to try to design
something similar for the Geyrfugl.
My original white-water kayak also had a steel wire loop above the deck
to enable it to be secured to a roofrack or other "immovable" object with a
bicycle lock. I had arranged for a similar security fitting on my North
Shore Mistral sea kayak which was built for me in 2001. Despite its obvious
uniqueness and identifiability, I reckoned that a hand-built kayak should
also have some sort of point to attach a lock, to at least deter casual
theft.
Finally, Nick's suggested method of attaching end grab loops by drilling
a hole through the hull and resin end-pour was not going to work with the
boat's name applied to the bow in just the place where such a hole would go.
Clearly I needed to find a way to attach toggles to lie on the deck, without
hanging the weight of the boat purely from the deck when being carried.
I designed solutions for each of these needs which are different from
any I have seen elsewhere, so this page is to show a few close-up photos
and document the way these features were implemented.
I evolved the method for recessed deck fittings whilst building the
hybrid Cormorant, and this time took lots of photos, so they now have
their own page.
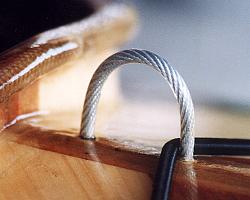 The security
fitting is made from plastic-coated steel wire (I bought a metre from my
local B&Q, which will be enough for several such fittings). This is
threaded through two slightly oversized holes drilled in the reinforced bit
of deck peak just aft of the cockpit rim (where it neither interferes with
the deck rigging, nor with a paddler climbing into the cockpit). A panel pin
was passed through each end of the wire on the underside of the deck and the
wire laid flat to the deck (each end held in place by the panel pin which was
passed through the other wire). All the wire and pins below the deck were
encased in thickened epoxy, some of which also fills the oversize of the
drilled holes. Pre-SRT-era cavers will recognise this as being derived from
the pin-and-araldite method of building electron ladders. The oversize of the
holes at the deck surface was filled with clear epoxy when the weave of the
glass was filled. Clearly, someone with bolt croppers or really serious
wire-cutters could overcome this security measure, but someone so equipped
could probably cut the bike lock. A casual thief would have to do a lot of
damage to rip the wire through the deck.
The security
fitting is made from plastic-coated steel wire (I bought a metre from my
local B&Q, which will be enough for several such fittings). This is
threaded through two slightly oversized holes drilled in the reinforced bit
of deck peak just aft of the cockpit rim (where it neither interferes with
the deck rigging, nor with a paddler climbing into the cockpit). A panel pin
was passed through each end of the wire on the underside of the deck and the
wire laid flat to the deck (each end held in place by the panel pin which was
passed through the other wire). All the wire and pins below the deck were
encased in thickened epoxy, some of which also fills the oversize of the
drilled holes. Pre-SRT-era cavers will recognise this as being derived from
the pin-and-araldite method of building electron ladders. The oversize of the
holes at the deck surface was filled with clear epoxy when the weave of the
glass was filled. Clearly, someone with bolt croppers or really serious
wire-cutters could overcome this security measure, but someone so equipped
could probably cut the bike lock. A casual thief would have to do a lot of
damage to rip the wire through the deck.
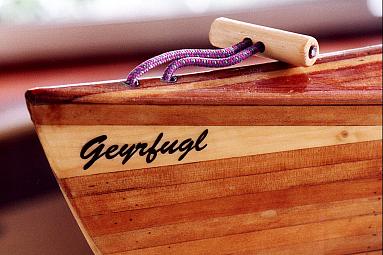 I wanted the rope for
the end-grab toggles to pass through the deck, not the hull, but an obvious
potential problem with this is that the hull to deck seam at the very ends of
the boat is hard to reach when mating the two halves. Consequently, there is
a risk that the deck may not be strongly attached at these points - I didn't
want to chance pulling a chunk of deck off the boat when lifting it fully
loaded. To make these fittings, I threaded some static accessory cord (a
piece from a discarded sling on a climbing runner) through some polythene
tubing, then bent this over a piece of dowel into a tight curve, clamping the
ends together. I then softened the tube with hot air from a hot-air paint
stripper. A bit of trial and error resulted in tubing with a tight bend,
which hadn't squashed and from which the cord could be removed. A slightly
thinner (next size down) cord could easily be threaded through the resulting
"U" shape. At the bow and stern, one of these "U" tubes was placed round a
short length of dowel cut to fit across the hull a couple of centimetres down
from the deck level, with the two open tube ends sticking up a couple of
centimetres above the deck level. The dowel was a tight fit, the tube was
held temporarily with a rubber band, and the whole affair epoxied in place.
Below the tube, a quantity of polythene foam filled the narrowest part of the
hull, minimising the amount of epoxy which would later be needed for the end
pours. The exact positions of the tubes were then transferred to the deck,
and clearance holes drilled for the tubes to stick up through the deck. The
deck was fitted to the hull over the tubes, and after the seams had cured,
epoxy thickened with micro-balloons was used for an end-pour at each end,
completely enclosing the tubes and the polythene foam. The oversize of the
drilled holes was partly filled by these end pours, and came flush with the
deck when the weave on the glass was filled. The tubes were then cut off
neatly flush with the deck surface. The result is a neat tube into which can
be threaded a cord for the end grabs, which loads the dowel epoxied into the
hull, rather than the deck itself, when the boat is lifted. Although the cord
is epoxied into the toggles, it is free to move in the tube, so that
replacement is simply a matter of cutting the cord, threading a new one, and
fixing it into a new toggle. The current toggles are made from 20mm dowel
drilled down the middle to make a tube into which the ends of the cord are
passed via two fairly tight-fitting holes in the middle. The centre is then
filled with epoxy, and the ends of the cord trimmed flush.
I wanted the rope for
the end-grab toggles to pass through the deck, not the hull, but an obvious
potential problem with this is that the hull to deck seam at the very ends of
the boat is hard to reach when mating the two halves. Consequently, there is
a risk that the deck may not be strongly attached at these points - I didn't
want to chance pulling a chunk of deck off the boat when lifting it fully
loaded. To make these fittings, I threaded some static accessory cord (a
piece from a discarded sling on a climbing runner) through some polythene
tubing, then bent this over a piece of dowel into a tight curve, clamping the
ends together. I then softened the tube with hot air from a hot-air paint
stripper. A bit of trial and error resulted in tubing with a tight bend,
which hadn't squashed and from which the cord could be removed. A slightly
thinner (next size down) cord could easily be threaded through the resulting
"U" shape. At the bow and stern, one of these "U" tubes was placed round a
short length of dowel cut to fit across the hull a couple of centimetres down
from the deck level, with the two open tube ends sticking up a couple of
centimetres above the deck level. The dowel was a tight fit, the tube was
held temporarily with a rubber band, and the whole affair epoxied in place.
Below the tube, a quantity of polythene foam filled the narrowest part of the
hull, minimising the amount of epoxy which would later be needed for the end
pours. The exact positions of the tubes were then transferred to the deck,
and clearance holes drilled for the tubes to stick up through the deck. The
deck was fitted to the hull over the tubes, and after the seams had cured,
epoxy thickened with micro-balloons was used for an end-pour at each end,
completely enclosing the tubes and the polythene foam. The oversize of the
drilled holes was partly filled by these end pours, and came flush with the
deck when the weave on the glass was filled. The tubes were then cut off
neatly flush with the deck surface. The result is a neat tube into which can
be threaded a cord for the end grabs, which loads the dowel epoxied into the
hull, rather than the deck itself, when the boat is lifted. Although the cord
is epoxied into the toggles, it is free to move in the tube, so that
replacement is simply a matter of cutting the cord, threading a new one, and
fixing it into a new toggle. The current toggles are made from 20mm dowel
drilled down the middle to make a tube into which the ends of the cord are
passed via two fairly tight-fitting holes in the middle. The centre is then
filled with epoxy, and the ends of the cord trimmed flush.
© A.E.R.Waddington, 2002
Contact the author: mailbox <andrew>
on site <pennine.demon.co.uk>