
Nick Schade's suggested methods of fitting hatch-retaining straps and deck lines rely on hardwood pad-eyes fitted to the deck. All my previous reading suggests that sticky-up deck fittings tend to make deep-water rescues harder and can shred clothing, especially things like drysuits which don't work well with holes in ! All the commercially built (composite or roto-moulded) sea kayaks I have seen have recessed deck fittings and I decided to try to design something similar for the Geyrfugl.
Geyrfugl needed nineteen recessed deck fittings to support the deck layout of elastics, deck lines and tape straps to retain the hatch covers:
Using commercial hatches meant only twelve fittings were needed on the Cormorant, since hatch retaining straps weren't required. This also gave a cleaner deck layout aft:

 A slightly less effortsome method of fabrication became available for
my second boat with the discovery that I could buy 5 cm diameter wooden
balls with a hole through the centre from the Art Shop in Darlington.
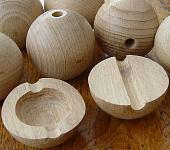
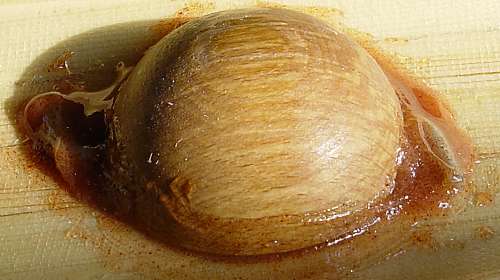
This is the method I will describe, which starts by feeding these balls
into the bandsaw to cut them into two hemispheres. The centre of each
hemisphere is then hollowed out, initially with a router, finishing with
a high-speed cutter in a Minicraft drill, then with abrasives. The result
is coated with epoxy.
A slightly less effortsome method of fabrication became available for
my second boat with the discovery that I could buy 5 cm diameter wooden
balls with a hole through the centre from the Art Shop in Darlington.
This is the method I will describe, which starts by feeding these balls
into the bandsaw to cut them into two hemispheres. The centre of each
hemisphere is then hollowed out, initially with a router, finishing with
a high-speed cutter in a Minicraft drill, then with abrasives. The result
is coated with epoxy.
 Small
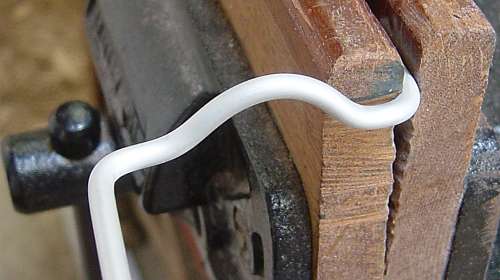
Small 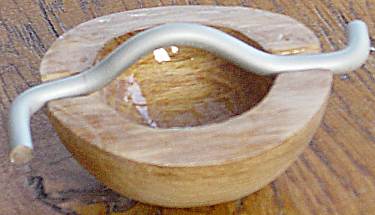 diameter anodised aluminium rod is now bent
into a series of curves and corners to fit inside the groove. The photos show
the final bend in the vice (all done by eye and not measured - no doubt a jig
could be devised), and the bar in position on a ball. The right angle bends
outside the ball leave sections of the rod which will lie flat against the
inside of the deck, resisting any tendency of the rod to be rotated, which
could lead to a failure of the epoxy and leakage of water. For deck fittings
used to hold 20mm tape for hatch hold-downs, the rod remains straight across
the hollow in the hemisphere, but the bulge up is definitely an improvement
for those fittings holding deck lines.
diameter anodised aluminium rod is now bent
into a series of curves and corners to fit inside the groove. The photos show
the final bend in the vice (all done by eye and not measured - no doubt a jig
could be devised), and the bar in position on a ball. The right angle bends
outside the ball leave sections of the rod which will lie flat against the
inside of the deck, resisting any tendency of the rod to be rotated, which
could lead to a failure of the epoxy and leakage of water. For deck fittings
used to hold 20mm tape for hatch hold-downs, the rod remains straight across
the hollow in the hemisphere, but the bulge up is definitely an improvement
for those fittings holding deck lines.
 Holes are now drilled in the deck. I usually do
these well undersized and then ream out the holes, to get the position
exactly right and to avoid tearing off glass from the surface when drilling.
The holes are a little wider on the outside surface.
Holes are now drilled in the deck. I usually do
these well undersized and then ream out the holes, to get the position
exactly right and to avoid tearing off glass from the surface when drilling.
The holes are a little wider on the outside surface.
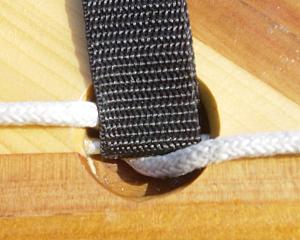
 A needle file cuts small grooves on the edges
of the hole inside the deck, which helps the rod stand a little higher on the
deck, and helps hold it in position when gluing. The left photo shows a rod
in position inside the deck (this hole happens to have intersected one of the
thin ash laminations on the inside of the deck acting as a minimalist deck
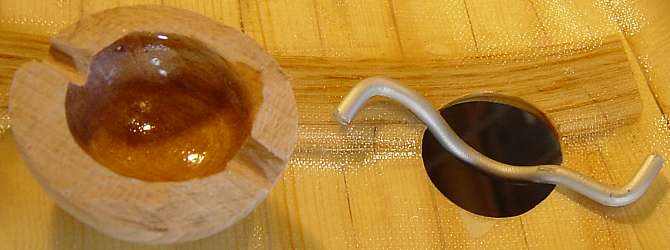
beam - bad planning). The wooden hemisphere is filed to fit the curve of the
deck and ensure it will be a snug fit over the aluminium rod. The photo right
shows the fitting glued in place using epoxy thickened with (in this case)
silica and Padauk sawdust. I haven't found it necessary to glass over these
fittings.
A needle file cuts small grooves on the edges
of the hole inside the deck, which helps the rod stand a little higher on the
deck, and helps hold it in position when gluing. The left photo shows a rod
in position inside the deck (this hole happens to have intersected one of the
thin ash laminations on the inside of the deck acting as a minimalist deck
beam - bad planning). The wooden hemisphere is filed to fit the curve of the
deck and ensure it will be a snug fit over the aluminium rod. The photo right
shows the fitting glued in place using epoxy thickened with (in this case)
silica and Padauk sawdust. I haven't found it necessary to glass over these
fittings.
 The
fittings on Geyrfugl are of two types.
The
fittings on Geyrfugl are of two types. 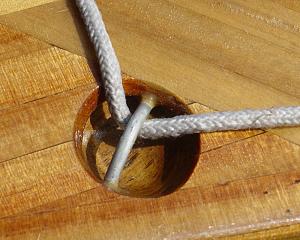 The 20mm tape straps for the hatch covers
fit onto straight anodised aluminium rod in recesses either side, whilst the
deck elastics and deck lines have fittings in similar recesses, but with the
aluminium rod bent to stick up somewhat above the deck, giving more room to
thread the cords. All the fittings on the Cormorant are of the latter
variety. There are nineteen fittings on Geyrfugl, which was actually a
considerable amount of work, but they do look good and won't catch on
clothing. Very little cleaning up of squeezed out epoxy was needed, though
one or two small voids had to be filled later with thickened epoxy. The
hardwood used on Geyrfugl was Olive - perhaps a bit heavy, but this was what
was to hand, and a dark colour seems to work well. The Art Shop balls are a
light coloured wood, which fitted well with the pine parts of the Cormorant
deck, and didn't look bad with the Cedar or Purpleheart,
either.
The 20mm tape straps for the hatch covers
fit onto straight anodised aluminium rod in recesses either side, whilst the
deck elastics and deck lines have fittings in similar recesses, but with the
aluminium rod bent to stick up somewhat above the deck, giving more room to
thread the cords. All the fittings on the Cormorant are of the latter
variety. There are nineteen fittings on Geyrfugl, which was actually a
considerable amount of work, but they do look good and won't catch on
clothing. Very little cleaning up of squeezed out epoxy was needed, though
one or two small voids had to be filled later with thickened epoxy. The
hardwood used on Geyrfugl was Olive - perhaps a bit heavy, but this was what
was to hand, and a dark colour seems to work well. The Art Shop balls are a
light coloured wood, which fitted well with the pine parts of the Cormorant
deck, and didn't look bad with the Cedar or Purpleheart,
either.